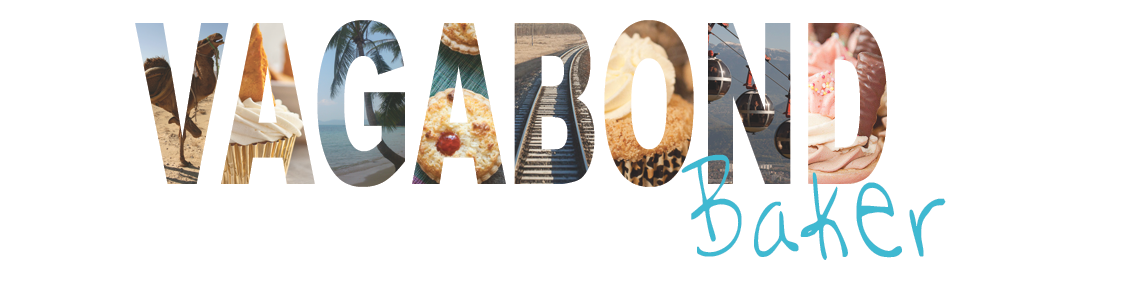
Vanilla Cupcakes and Sugarcraft Flowers
 Another drizzly day was passed creatively this weekend, making sugarcraft flowers. I haven’t used my sugar crafting bits and bobs since the wedding cake I made last August. I had an idea of making flowery cakes for Mother’s Day so dug out my sugarcraft box and spent a couple of hours happily cutting out, shaping and painting sugar flower paste.
The flowers may look fiddly but they really are quite easy. The equipment is fairly inexpensive and can all be bought at cake decorating stores, craft shops and online.

The cupcakes themselves are just simple vanilla sponges with vanilla buttercream frosting. If I had to pick a favourite cupcake, I think Vanilla would pip it. With good quality ingredients, it can’t be beaten.
I learnt the basics of sugarcraft at a one day cupcake decorating class I did last year. It was lots of fun and I’d certainly recommend doing one.
Sugarcraft Flowers
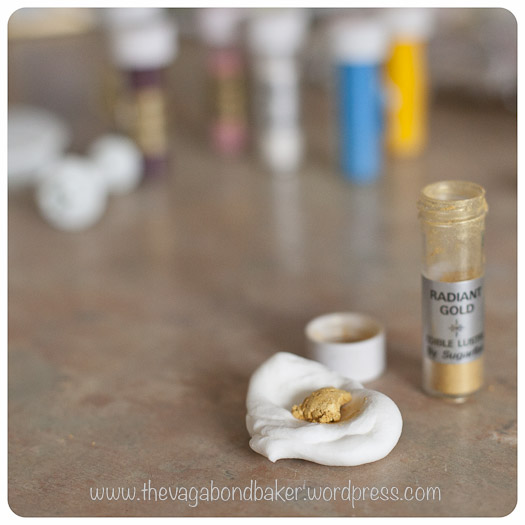
flower cutters such as Gerbera and Rose Petal, a ball tool, a non stick rolling-pin, an egg box or shallow fruit tray for shaping and drying the flowers
- white or cream sugar flower paste
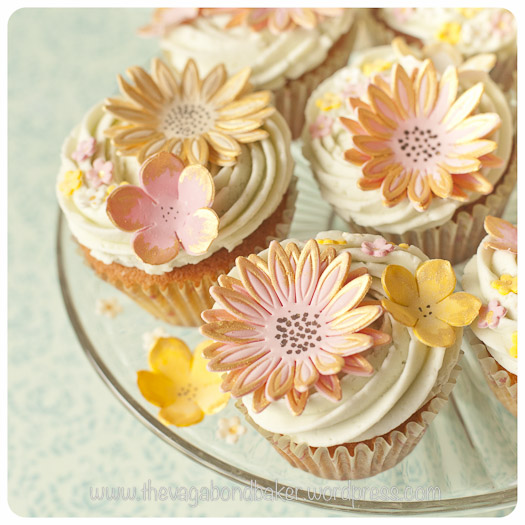
- edible lustre dust, in various colours
- Sugarflair Rejuvenator spirit fluid, or vodka
- edible glue {optional}
- icing sugar or cornflour for rolling out.
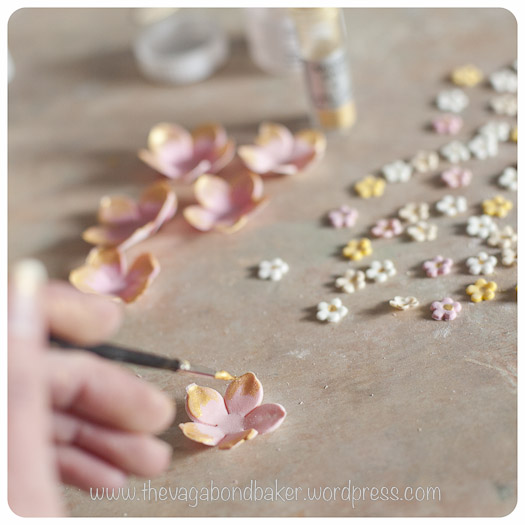
The trick to working sugar flower paste is to work with small pieces at a time, as it dries out quickly. Pinch a chunk or the paste out of the pack and work it in your hand until it is pliable. If you want to colour it make an indentation in the chunk of paste and add a tiny heap of edible lustre dust. Work the dust in with your fingers. Don’t add too much to start with, better to build up to the colour you want. You can colour larger chunks of the paste, just remember to put it back into the bag and work with small pieces of it.
Once coloured, dust your work surface with icing sugar or cornflour. Roll out very thin using a non stick rolling-pin. Stamp out the flower with your cutter. Either leave to dry flat or encourage a more shapely flower by laying it into an egg box or the shallow trays that apple and such are transported in. They will take an hour or so to dry out enough to further decorate.
-
- work in edible lustre dust to colour the paste
-
- use a flower stamp cutter
-
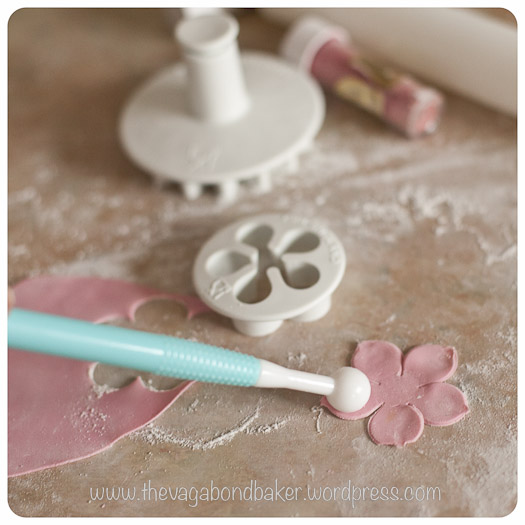
- shape the petals with a ball tool
-
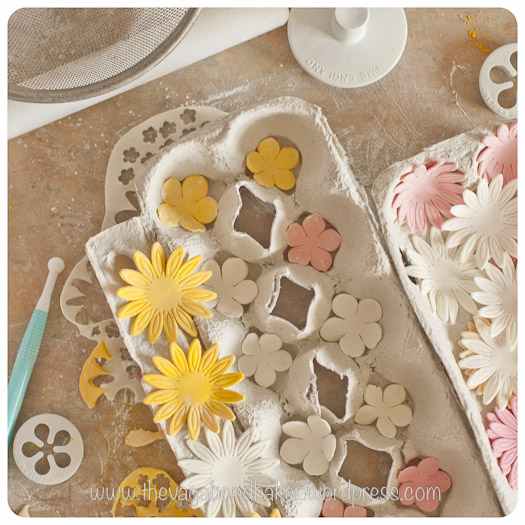
- leave to dry in an egg box or similar
-
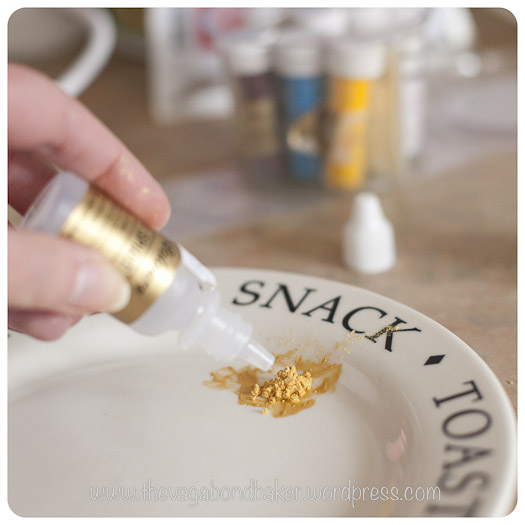
- use rejuvenator spirit, or vodka, to turn the lustre dust into paint
-
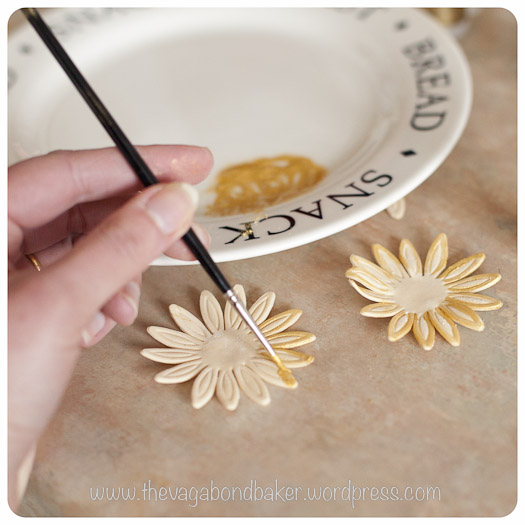
- Use a fine paint brush
-
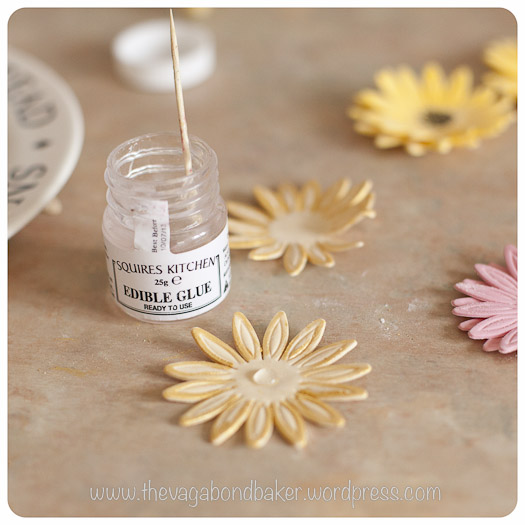
- edible glue, or a dab of vodka to glue layers together
-
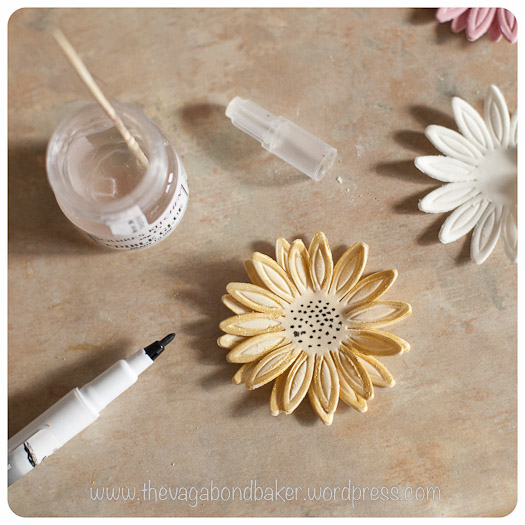
- I used an edible felt pen to add detail to the flowers
-
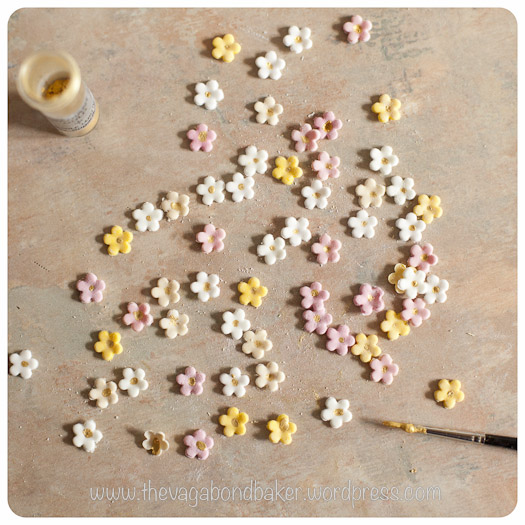
- tiny flowers
-
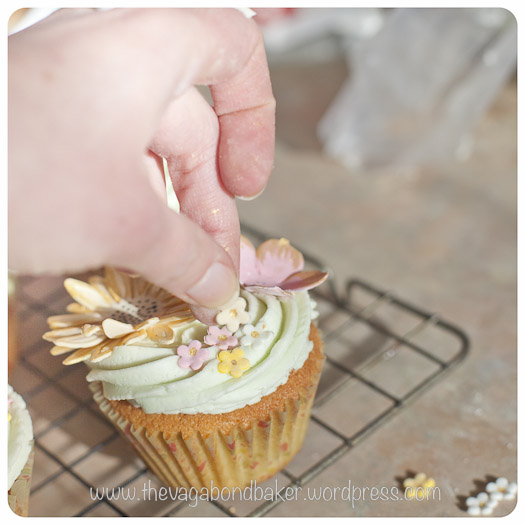
- decorating the petals
Once they are dry you can paint or dust lustre powder over them. I painted mine. Put a little heap of lustre powder onto a plate then add drops of rejuvenator spirit fluid, or vodka {I prefer the rejuvenator fluid as it comes in a handy dropper bottle}. Paint detail onto your flowers with a very fine paintbrush. I find the lustre paint needs regular ‘feeding’ with the rejuvenator spirit to keep it fluid, it’s very thirsty!
The gerbera flowers can be doubled up, glue one on top of the other with edible glue, or a spot of vodka or water. You can add detail with an edible felt pen or black icing.
oven 180 C / gas 4 / 350 F
12 hole muffin pan lined with paper cases
- 125 g {4.5 ounces} soft unsalted butter
- 125 g {1/2 cup} caster sugar
- 2 free range eggs
- 1 tsp vanilla extract
- 140 g {1 + 1/10th cup} self-raising flour
- 2 tbsp live plain yoghurt or sour cream
- 2 tbsp milk {or 3 tbsp milk and no yoghurt}
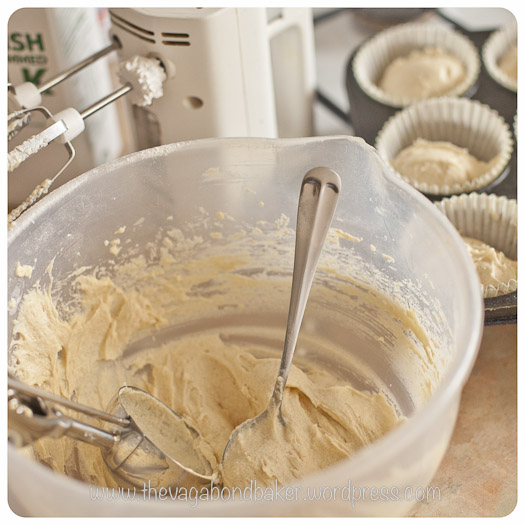
Beat the butter and sugar together until pale and fluffy either by hand with a wooden spoon or with an electric mixer. Break the eggs into a small jug or cup, add the vanilla and beat well with a fork.
Add the beaten egg to the butter and sugar a bit at a time, beating well in between, followed by the yogurt or sour cream if using. Don’t worry if it splits, the flour will deal with that.
Sift in the flour then fold in with a metal spoon. Stir in the milk.
Divide the batter into the cake cakes, about 3/4 full. Bake for 20 to 25 minutes until risen and golden. A cake tester or skewer inserted into one of the cakes should come out clean. Remove from the tin and cool completely on a wire rack.
-
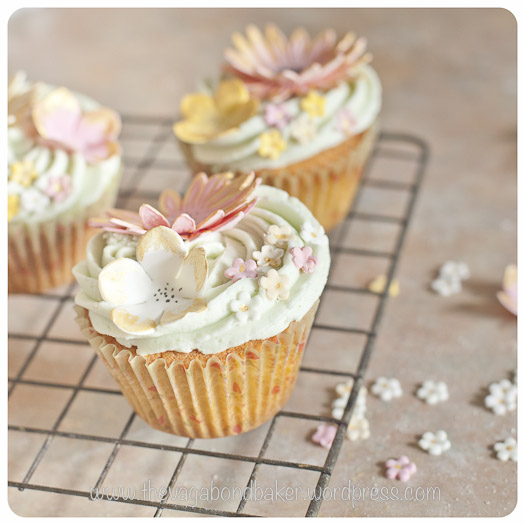
- decorate the cakes with the sugar paste flowers
-
- divide the sponge batter into the cake cases
-
- Vanilla Cupcakes and Sugarcraft Flowers http://vagabondbaker.com/2013/03/10/vanilla-cupcakes-and-sugarcraft-flowers/
Vanilla Buttercream {adapted from the Primrose Bakery cupcake book}
- 100 g {1 stick} soft unsalted butter
- 50 ml milk
- 450 g {3 + 1/2 cups or more} icing sugar
- 1 tsp vanilla extract
- food colouring or edible lustre dust to tint your frosting {optional}
Place the butter into a large bowl and beat with an electric mixer until smooth, add the milk and beat again.
Sift in a third of the icing sugar and slowly beat it into the butter and milk. Repeat this until all the icing sugar is used up. If it still feels a little runny add more icing sugar.
Beat in the vanilla extract.
Finally, if you want to colour your buttercream, add a few drops of food colouring or a pinch of lustre dust and beat well.
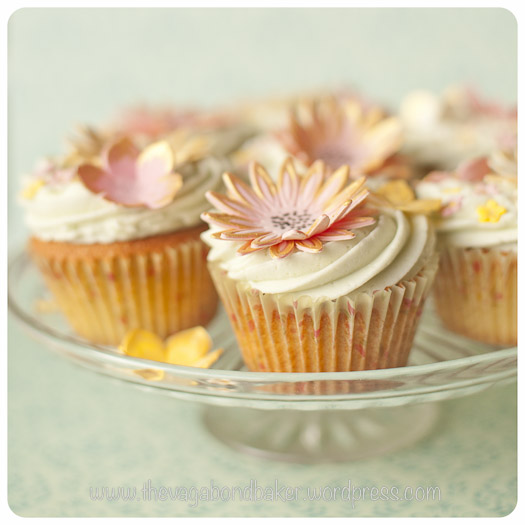
Pipe onto the cakes with a wide nozzle fitted to a piping bag. While the frosting is still ‘wet’ decorated the cakes with the sugarcraft flowers and turn them into something special.
Eat fresh as the sugar paste will soften over time from the moisture in the buttercream.

By Rachel Davis


Oh my you are so talented I just love your blog very nice setup and the pictures are nice too.
Thanks for sharing your talents.
Thank you so much! I loved making these and sharing what I make and where I go with everyone 🙂
They look beautiful! I fear it will be a long time until I have another fondant flower making day, but I look forward to it 🙂
I know, I enjoy making them but rarely get around to actually doing it. This was a rarity!
What a nice way to spend a rainy day…..they look gorgeous, so pretty + delicate.
My Cupcake Habit
Thank you, I love being a bit crafty every now and again xxx
These cupcakes are gorgeous!
Thank you! xxxx
Wow these are so beautiful. In addition to Mother’s Day, I could see this making an excellent Easter or springtime treat!
Yes, they’re very springtime lovely. Mind you, our spring has disappeared, we’ve had snow for two days in a row and it’s bloomin’ freezing!
Wow, those are absolutely gorgeous! Very artistic! Question: your hand model has lovely nails, do you do your own hand modeling for the photos? Do you have to get a manicure for each blog posting? That could really add up if you post a lot… 😉
hee hee, they’re my hands! everyone will think I’m left handed but I’m not. I find it a bit tricky but I can only hold my camera in my right. I never get a manicure, my thumb nails fortunately stay quite neat. The others look awful most of the time. the shallow depth of field I use to photograph is also very forgiving!
Simply gorgeous - you’re very patient!
I am if it’s a horrid day outside. Cosy and occupied in the kitchen 🙂
Beautiful!
Thank you xxxxxxx
So, so pretty!
Thank you xxxxxxx